Blue-bot & Bee-bot
What is a Blue-bot and a Bee bot?
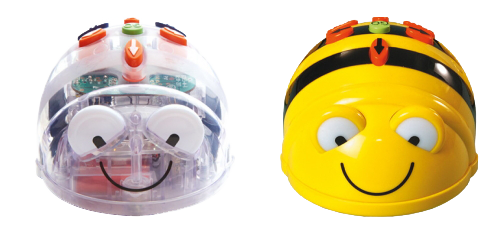
They both look very similar but are slightly different. The Blue-bot can do a bit more then the Bee-bot. Besides that I like the Blue-bot more because it is transparent and allows the toddlers to see what is inside of a robot. You can program the B-bot with a free app on your phone or tablet and a tactile reader as well.
How do they work?
On the back of the robot you have 7 buttons: move forward, rotate right, rotate left, move backwards, go, pause 1 second and clear instructions. Underneath you can switch the robot on and off. The robot can remember around 200 steps. This is the same for the Blue bot and the Bee bot.
- Make a sequence of instructions and then press the go button.
- To enter a new set of instructions pres the clear button. If the clear button is not pressed, new instructions will be added to the existing sequence.
- Pressing the pause button will add a pause instruction to the sequence.
There are two more options to program the Blue-bot. That is with the tactile reader and a free application for Android, iOS, Windows or Mac OS X containing compatible Bluetooth hardware. Blue-bot is compatible with Bluetooth specification version 3.0/4.0 + EDR onwards.
Tactile reader Blue-bot
Connecting to Blue-Bot is quite simple.You switch the Blue-Bot on and press 'connect' on the reader. Wait until the eyes of the Blue-Bot turn blue and then it's ready to use! Now the toddlers are able to program the robot from a distance.
Free application Blue-bot
The robot works with Bluetooth. Now you can program from a distance. You choose a background on the app or you can take a picture from your own board and raster it the same way.
How to introduce the the Blue and Bee bot?
Pick a topic to work with
You work around two main goals with those robots, programming, logical thinking, problem solving, and the topic you are working around. Pick a topic that is interesting to the children. You do not have to work only around robots. You can use the robot as an extension to what you want to teach.
Time to play
The first stage of working with a robot is to let the toddlers explore what it can. Don't interfere too much in this process it is important that they discover it by themselves by trying. Later you can make assignment cards or give them instructions.


TTS has several maps that you can use. You can use them for the Bee-bot, Blue-bot as well for Primo Cubetto. The city map includes 35 instruction cards, these variate in difficulty. Those maps gives you lots of different opportunities to work around. When you take a close look to the city map it also includes numbers and letters, matrix, symbols and so on. The children program the B-Bot from one element to another, which trains their visual perception at the same time. There are many more maps or you can make one by yourself.
My own experiences
The children loved to explore what the robot could do and surprisingly they figure it out quite quickly. The blue bot is an inviting robot by the transparent casing. When you use the blue-bot with the tactile reader I noticed it is more difficult, the blocs are confusing because you can use them in two different directions and sides.

Do you want to read more about robots in the classroom and how they help children in their development? Read my previous post about "How to include robotics and programming in STEAM for toddlers".


Comments
Post a Comment